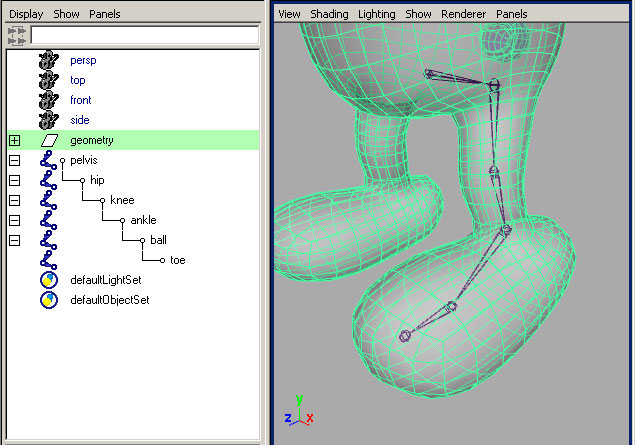
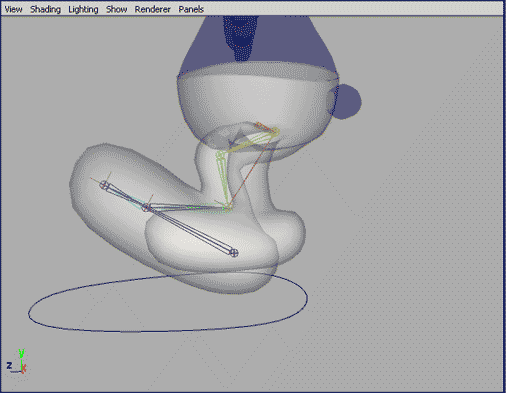
Much like we did earlier, I've set up a series of joints inside the smurf's leg to act as the skeleton for this next example. Since I'll only be rigging the one leg, I've skipped the "left" naming convention. To repeat this: place each joint where you want the smurf to be able to bend, and line them up in the center of the geometry. |
|
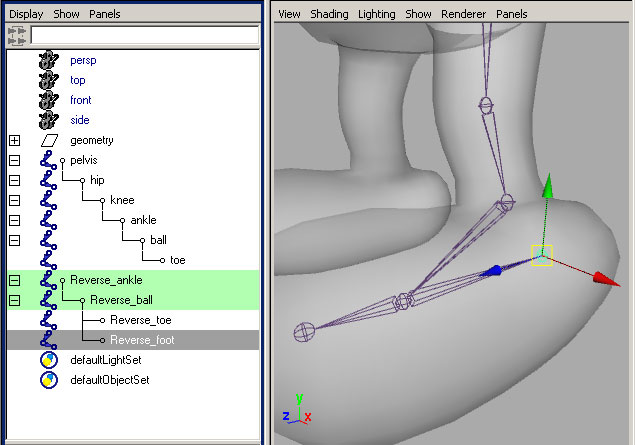
We'll want the foot to be able to affect the entire leg, so let's spend some extra time building the foot hierarchy. Start by duplicating the ankle, and pulling it out of the hierarchy. Then duplicate the toe joint and adjust the names. I like to use a naming convention like "reverse" because that's the type of control these bones are for. |
|
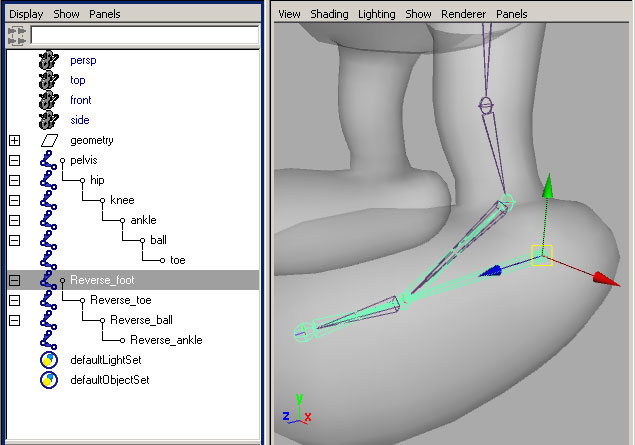
After placing the duplicated toe bone in the center of the heel, re-order the new hierarchy in reverse. The bone in the heel should be the new root, followed by the toe, then the ball and ankle joints. Ultimately, this will let us drive the entire leg with the foot bone. For the next step though, it'll only be in the way. You may want to hide this part of the rig temporarily by selecting the new foot bone and hitting Ctrl+"h". |
|
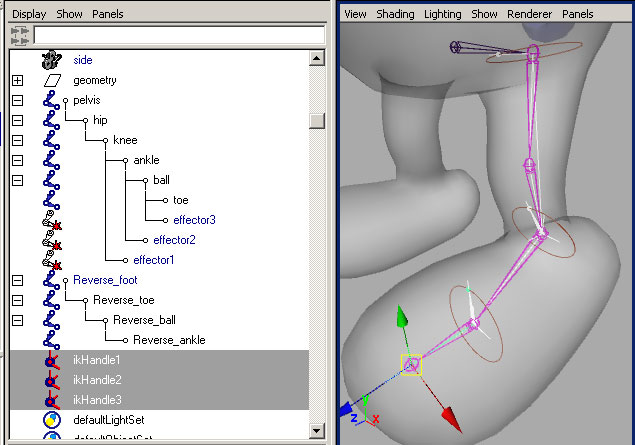
Now we need to add IK. From the "skeleton" menu in Maya, chose the IK handle tool. With this tool active, pick the "hip" bone and then the "ankle" bone in the viewport. Re-activate the tool hitting the recent tool icon  on the left of your Maya window. Draw another handle from the "ankle" to the "ball", and a last one from the "ball" to the "toe". |
|
This next step is what gives the "Reverse_foot" all the power. Move the new ikHandles into the "reverse" hierarchy as shown below. The handle on the ankle goes under the "Reverse_ankle" bone. The one on the ball goes under the "Reverse_ball" and the last one is for the "Reverse_toe". |
|
Now if we throw some quick binding on the geometry, this new leg can take on a little life. Select the "pelvis" and the "geometry" nodes and smooth bind to the joint hierarchy. Bind everything above the hip area of the geometry 100% to the "pelvis". Now when you move the "Reverse_foot" bone around, you should see some very human-like motion in the leg.
To really expose the power of this setup, lets add a controller. A quick way to make one is to create a NurbsPrimatives>Circle from the Create menu in Maya. Move the circle under the foot and scale it to size. If you hit F9 you'll be able to shape the circle more like a foot. Hit F8 to return to normal functionality. Once you've made the controller, name it and freeze transforms from the modify menu. Edit>delete by type>history should also be run at this point. |
 |
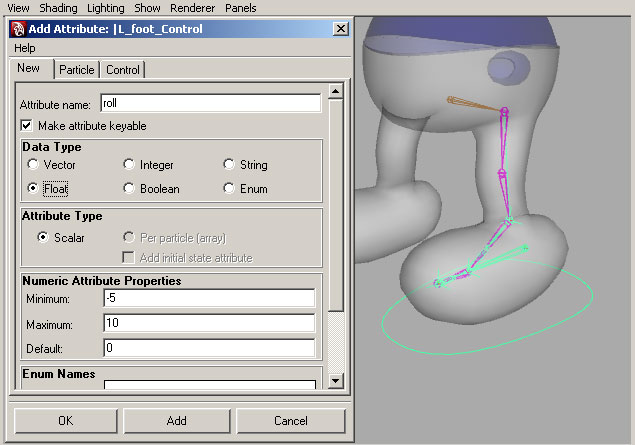
| Now with your "Reverse_foot" bone selected, shift+select the new control. Hit "p" on the keyboard to re-parent the foot control bones under the controller. Now we'll need a custom attribute for controlling multiple bones. I usually name this attribute "roll" because I use it to roll the character's foot up onto it's toes. You'll find the add attribute options under the Modify menu in Maya. We'll need min and max values of -5 and 10 respectively. |
 |
| There are many ways to have the custom attribute manipulate the foot the way I want, but the fastest might be with set-driven-key. The tool is located under the Animate menu in Maya. Select the new attribute as your driver, and the rotateX attribute on the "Reverse_foot" bone to be driven. Press "Key". Load the "Reverse_toe" and "Reverse_ball" and set keys on both of their rotateX attributes as well. |
 |
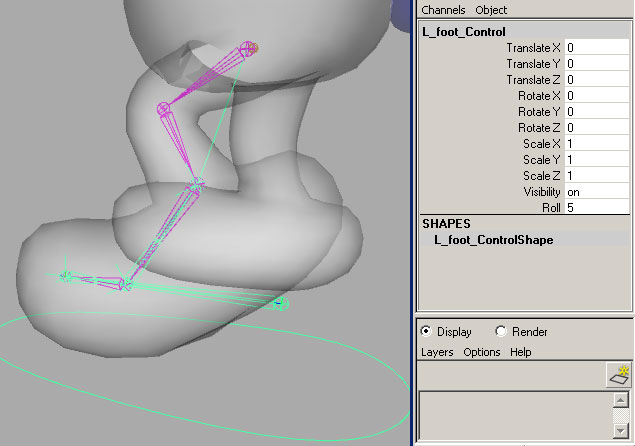
| Now change the new roll attribute on the controller to -5 and set another key on the "Reverse_toe" and "Reverse_ball" rotateX attributes at 0. This is where it starts to get interesting. Set the rotateX attribute to -30 on the "Reverse_foot" bone and set a key. Now watch what happens when you change the controller's roll attribute from -5 back to 0. You should see the foot rolling from it's heel back to the ground. |
 |
| If you set the controller's roll attribute to 5, nothing happens - yet. With the controller at 5, set keys on the "Reverse_toe" rotateX at 0 and the "Reverse_ball" rotateX at 30. Finally, set the controller's roll attribute to 10 and set keys on "Reverse_toe" rotateX at 60 and the "Reverse_ball" rotateX at 0 and the "Reverse_foot" rotateX at 0. |
 |
| Ultimately, the goal is to make animating something like a walk cycle much easier than it would be if the animator only had bones to animate with. This simple animation was done using just translation keys and our new roll attribute. |
|
Some things to point out here - The "Reverse_*" bones in our rig are part of the controls. They could have been any objects in a hierarchy, but they are easier to manipulate as bones. It's important to keep these bones separate from the regular skeleton though, and they should never have any binding data.
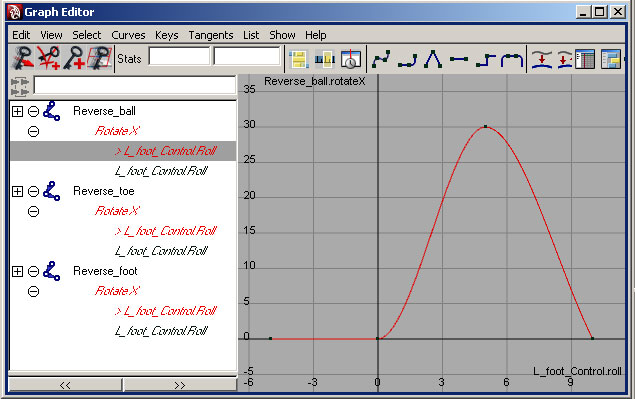
Now that we've connected them to the "L_foot_control" with set-driven-key, they have animation curves attached to them. You can edit how the "roll" attribute we made affects these joints in the Graph Editor, much like you edit any other type of animation.
|
To do:
Modify the rig you've been working on to include IK legs and controllers with custom attributes. These attributes don't have to control a reverse foot, but should make the character easier to animate.
|