
The skeleton:
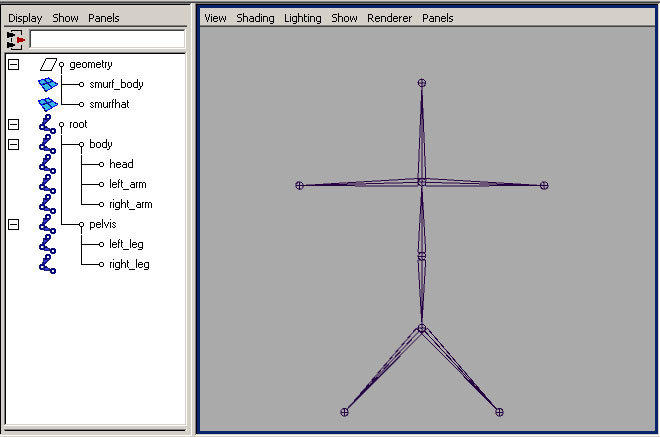
There's many ways to build a skeleton that will work for this smurf. The general idea is to keep it as simple as possible while satisfying the animator's need for control.
Every skeleton has at least on thing in common: a tree-like hierarchy. There's always a central point or parent of all other bones in the skeleton, and that bone is typically called the "root". In a humanoid rig, like the one we'll build for this smurf, the root extends outward in two directions. The bones that get added pointing downward from the root will eventually give us control of the legs, while bones added on the other side are for the torso, head and arms. Here's a simplified example:
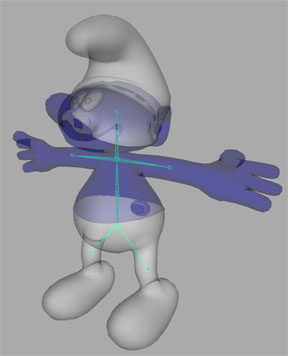
If you placed your joints where I did, your smurf should look like this in X-ray mode. To see how this will effect our character we can do a quick bind. To do this: select both the root and the geometry and use the "smooth bind" tool.
 The default settings for this tool will do for now.
Now notice what happens when you select the "body" bone and rotate it. The head and arms of the smurf should swing around. This is because the geometry is now "bound" to the skeleton. The legs don't move with the body bone because they are more influenced by the leg bones. Binding has a somewhat magnetic feel to it. Think of each joint as having a magnetic pull to the geometry around it. Notice what happens when you move one of the arm bones around. The head gets distorted because the arm bone has influence on the nearby parts of the face. When you first set your default binding on a character, it's very likely that many bones will influence unwanted parts of the geometry. No problem, there's a way to fix that.
The smooth binding tool
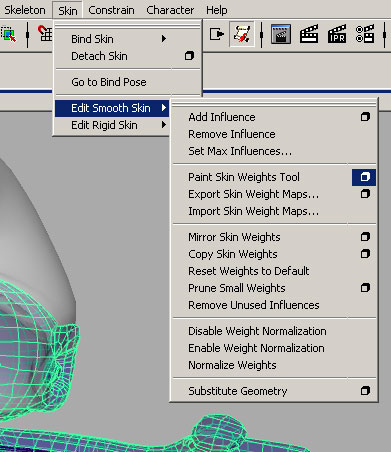
The tool is selection based, so first select the body of the smurf, then pick click the little box at the end of the menu option "Paint Skin Weights Tool" as shown on the right.
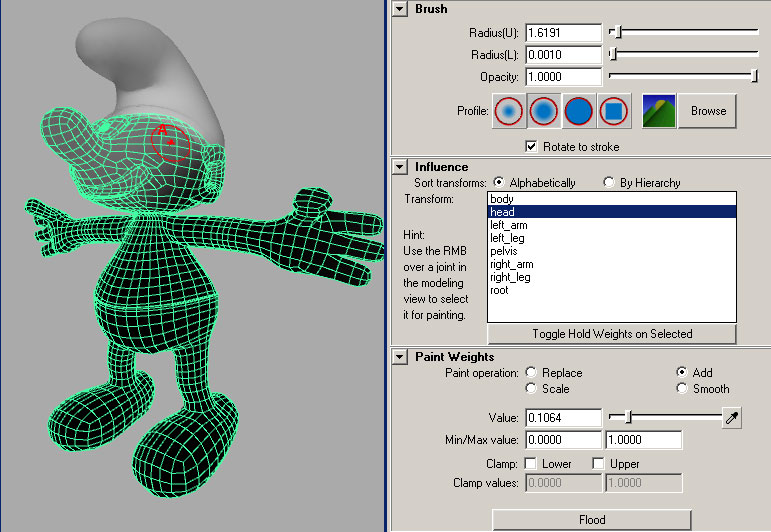
Your character should now look black and white with a green wireframe overlay. To the right you should see a list of all the bones that influence the geometry. This is why good bone names are important. As you pick different bones from the list, you'll notice that the gray and white areas of the skin change. What you're seeing is the amount of influence each bone has. The closer to white, the more that part of the skin is influenced by the selected bone.
Now move the curser over the skin. You should see a white paint brush in a red circle. The red circle shows how much of an area your paint brush can modify. If your red circle is to large or small to work with, you can easily change it by holding down "b" while you click and drag right and left over the character.
To keep the arm from distorting the face, let's paint more weight on the "head" bone for the face geometry. With the "head" bone selected on the right, click and drag the brush over the smurf's face. If your brush settings are at default, you'll see the skin change bright white where you are painting. Finish painting the whole head this way and then return to the rotation tool by pressing "e".
Now when you rotate the "left_arm" bone, you'll see that the head no longer distorts. Although the hat is still pretty bad off. So now with the hat selected, click the ![]() button on the left of the Maya window. Select the "head" bone from the list on the right and press the "Flood" button in the "Paint Weights" section of the tool attributes. The entire hat is now only influenced by the "head" bone. Repeat this for the The other bones should no longer have any effect on any geometry from the neck up.
button on the left of the Maya window. Select the "head" bone from the list on the right and press the "Flood" button in the "Paint Weights" section of the tool attributes. The entire hat is now only influenced by the "head" bone. Repeat this for the The other bones should no longer have any effect on any geometry from the neck up.
Note: There are many ways to get good binding results using this tool, this is only one of them.
To edit the rig or geometry any further, we'll first have to unbind it. To do this just use the Skin menu (shown above) and hit "Detach Skin".
Some things to point out here -
The joint tool will let you quickly draw a string of joints. Go ahead and try it. Select the joint tool and draw a line of joints in the front view of your scene. The reason I prefer to duplicate a single joint is hidden in the attributes of the joints. If you select the first joint in the chain you just made and hit ctrl + "a" you'll get the attributes of that joint. The first box will show transform attributes and the second one will be for joint attributes, the last one being "Joint Orient". This value effects the direction your bone is facing. You can easily avoid having these odd values appear on creation by changing your joint tool settings to have an orientation of "none", but I want to save the meaning of joint orientation for a later lesson.
To do:
Make a complete skeleton with bones to move every part of the geometry including fingers. If you're feeling up to it, add bones to wiggle the ears, hat, nose, mouth and even for moving the eyes. Be sure to name every bone! Bring binding influence quality to a reasonable level, but do not spend much time on it - as we will be detaching again later.